 GORM TEPER
Shanghai
Posted on April 17, 2017
A few weeks ago I was lucky enough to have a week in Shanghai for business reasons. I managed to get out and see the city a little bit, and take some photos! Shanghai is now the largest city is the world. I feel very fortunate that I had a little spare time there. I hope to go back and see more of China soon! Here are some of my highlights!

Shanghai Skyline from The Bund. 5D Mark III | 24mm 1.4 Art

View from Shanghai Tower. 5D Mark III | 16-35mm 2.8L II

Jing’an temple 5D Mark III | 24mm 1.4 Art

Jade Buddha Temple. 5D Mark III | 135mm f2L
For the full Shanghai album, please click here
A weekend in Cinque Terre
Posted on April 9, 2017

Corniglia, 5D Mark III | 16-35mm 2.8L II
It was my wife’s birthday and we decided to take a long weekend trip somewhere. She, being Asian, and sick of winter naturally wanted to go somewhere warm! We checked out last minute flights, but in the end decided to go to the Cinque Terre region in Italy. It is only a 6 hour drive from Garmisch Partekirchen in Germany. Cinque Terre is somewhere I also wanted to see for ages, its a great place for photography. The region is renowned for it’s rugged terrain, plantations of lemon and other fruits, and of course it’s amazing villages perched on the cliffs. We decided to head for Vernazza, one of the 5 main towns to see, where we got a great little bed and breakfast place.
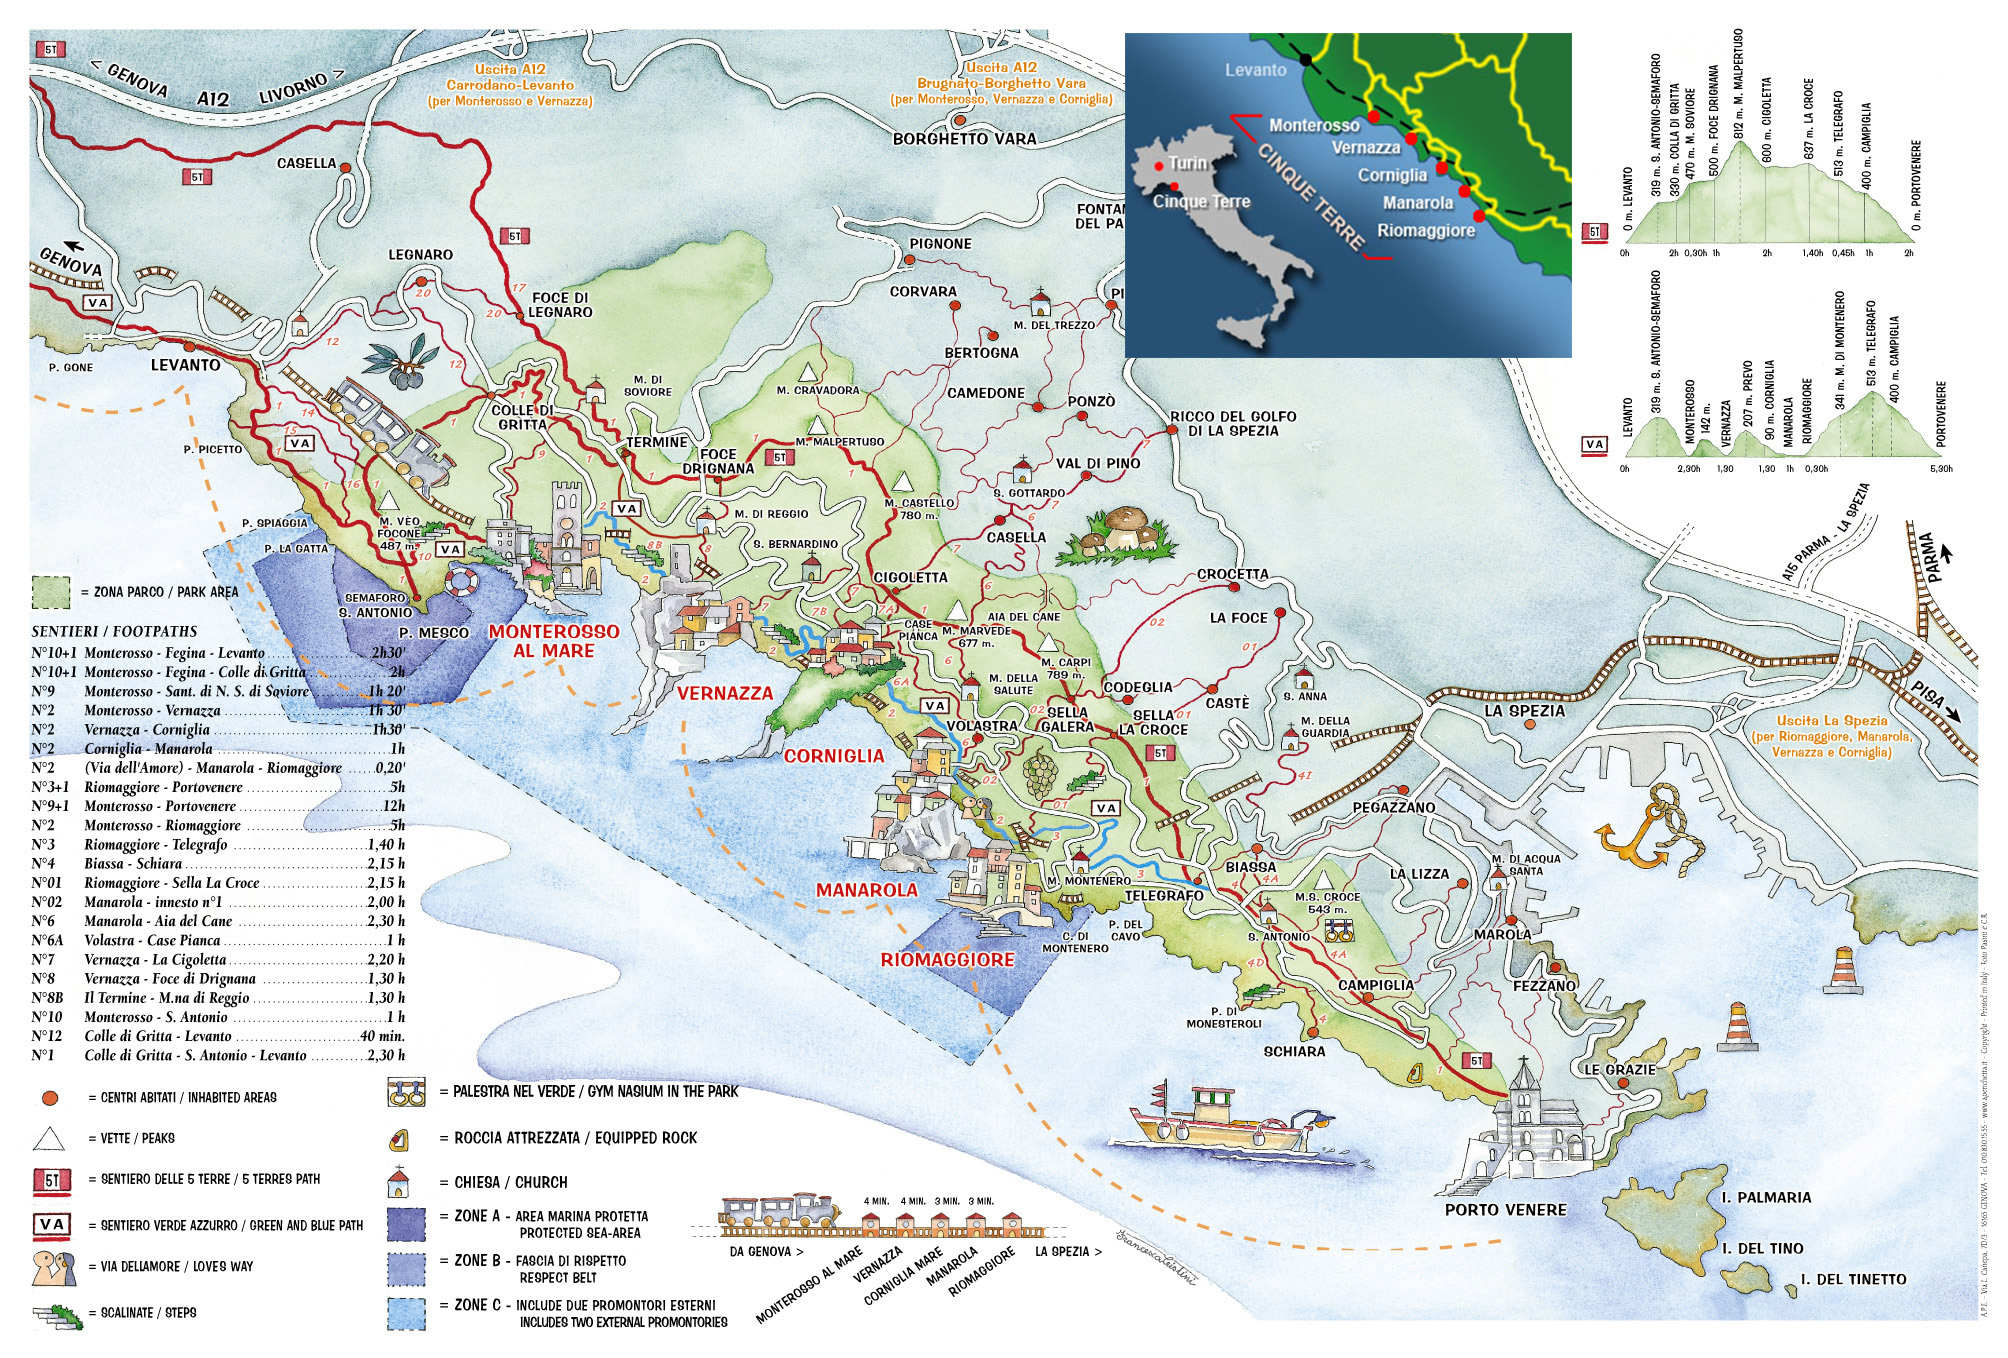
Map of Cinque Terre, credit: https://cinqueterre.a-turist.com/map
As you can see from the map above, the five towns are close together, and linked easily by train. Cars are not allowed in most villages, and we parked our car about 1.2km away from Vernazza and had to walk down, but not not a big deal. You can also go between the villages by boat, which is suppose to be a relaxing way of commuting, but in low season these don’t run. Apart from driving which I wouldn’t recommend due to parking and the very narrow roads, the only other way is to hike. We hiked from Vernazza to Monterosso which takes around 2-3 hours. The trip is well worth it for the scenery, and it was very pleasant!
The region is renowned for it’s rugged terrain, plantations of lemon and other fruits, and of course it’s amazing villages perched on the cliffs.

Enjoying the sun on the trail between Vernazza and Monterosso, 5D Mark III | 50mm 1.4 Art

View from the trail down to Vernazza, 5D Mark III | 50mm 1.4 Art
I would recommend going in shoulder season, as I can imagine that there would be a lot of tourists in the middle of August. We already in late March saw tour groups. Having said that, we found that not that many people actually stay in the towns, at least not in Vernazza. It seems most tourists come by the train for just a few hours.
This is really a photographer’s paradise.
Good to know
- The roads in the Cinque Terre region are very narrow. If you have a big car or camper, you really need to consider this. Also, for the most part is it not possible to drive into the villages, you need to park outside the villages, and walk in with your stuff.
- The towns are quite small, and you will run out of things to do and see in each of them soon enough, so plan to see at least a couple of villages on your stay. That’s not to say they are boring, they certainly are not, they are very charming.
- Accommodation can quickly run out in your chosen village, so book early, and have a back up plan. We stayed at A Cà Da Nonna Di Callo Luca and it was very comfortable, and just 70 Euros per night with everything included and a good bathroom. I would highly recommend them! Find them on Booking.com. If all is lost, and you cannot stay in the villages, staying at La Spezia is a workable option. The train runs frequently and its a short trip.
- There is a hiking trail which runs through the region, and links up with the villages, for the more adventurous type this is really worth while. The track is well used, but a little rugged and steep in parts. It should be noted here that tent use is really difficult, and there is only one tent site 40mins away from Vernazza.
- There are small supermarkets if you need something, or planning on cooking yourself. There are also several good restaurants in each village. Prices are reasonable.
- We found the train a good way to get between villages, after you get used to the system. We got single tickets, but it is possible to get a day ticket for 13 Euros.

Monterosso, 5D Mark III | 16-35mm 2.8L II & B+W CPL
Photography Tips
This is really a photographer’s paradise. The scenery is great, the villages are colorful and the water is clear. After first seeing some photos from the region, I always wanted to go there. For the most part, it is the landscape photography opportunities which appeal most. Unfortunately, the light wasn’t very special when we were there, but I tried to make the best of it. Each village has several good vantage points for the best photos, but these can initially be a little hard to find, so check them out early or before you have to shoot the sunrise. You may also have a look at the local post office for post cards, and get an idea of the vantage points in advanced.

This is really the photo I wanted to get! 5D Mark III | 16-35mm 2.8L II | Lee Little Stopper & B+W CPL.

Dawn in Vernazza. 5D Mark III | 24mm 1.4 Art | Lee Pro-Glass 0.9 + GND 0.6 & X4 CPL
Usually, these vantage points are on the trail leading in and out of the village, this was certainly the case with Vernazza. Bring a tripod, and if you have filters bring them along. I got the above two images with a combination of neutral density filters, grad filters and polariser. Any scenic coastal environment such as Cinque Terre begs for long exposures and landscape filter use. I used my Canon 5D Mark III along with several lenses; 16-35mm 2.8L II, 14mm 2.8, 24mm 1.4 Art, 50mm 1.4 Art and the 100-400mm 4.5-5.6L IS II. Its really important to have a polariser handy to bring out the colour, refer to my short write up about polariser use here.

Vernazza at night, 5D Mark III | 24mm 1.4 Art

Vernazza at dawn, 5D Mark III | 16-35mm 2.8L II | Lee Little Stopper & B+W CPL | 46 seconds

Vernazza at dusk, 5D Mark III | 50mm 1.4 Art | Lee Pro-Glass 0.9 & X4 CPL | 48 seconds
Its really important to have a polariser handy to bring out the colour
Most of the shots above are 20-60 second exposures, using Lee neutral density filters. This is a great way to smooth out water and create drama in the picture. The other advantage of using ND filters is that due to the long exposure time, people who walk into your image don’t necessarily appear in the end result (as long as they keep moving!). If you are not into landscape photography, there are good street photography opportunities as well!

Good place for a nap, Riomaggiore. 5D Mark III | 50mm 1.4 Art

Riomaggiore, 5D Mark III | 16-35mm 2.8L II

Vanessa in Corniglia, 5D Mark III | 50mm 1.4 Art
Photography in Cinque Terre;
- Great location for landscape photography – Bring your tripod!
- If you have landscape filters – bring them, you will need them.
- If you don’t have a polariser, invest in one, they are well worth it here.
- If you want tourist free pictures, get up early, and watch the sun-rise.
- Using neutral density filters can remove people from images.
- Use the trail linking up the villages. There are great vantage points along it.
- Each village has something unique about it, and they are all worth visiting.
Hope you enjoyed reading this post about the Cinque Terre region. Please subscribe to my blog to stay up to date on all posts so you don’t miss a thing! Please comment or contact, I would appreciate the feedback.
Gallery from the weekend


Signs of Spring!
Posted on March 27, 2017

Spring is here!!! 5D Mark III | 180mm 2.8 Macro @ f2.8, Bad Bayersoien, Bavaria
So after a long and some-what disappointing winter I’m ready for Spring. Luckily, there are a few early signs of spring starting to show already! I am looking forward to the wild flowers blooming, and all the wonderful colour in the mountains. I hope to post much more this Spring, but I went for a morning walk the other day with my 180mm macro, and here is what I found! Finally some green on top of all that grey:


Fasching! (Carnival Season)
Posted on March 19, 2017

Dance girls at Fasching in Rieden am Forggensee, 5D Mark III | 85mm 1.2L II at 1.2.
Fasching is Germany’s carnival season. In Bavaria where I live, it’s taken very seriously! It starts November 11th, and lasts a couple of months until Shroud Tuesday. It is basically a Roman Catholic and Christian Orthodox celebration. It’s a time where people let their hair down, dress up and drink lots of beer. Although not an official holiday, everything grinds to a halt around Fasching. In many towns, there are Faschingsumzug, or parades. Here everyone that has dressed up has a chance to act silly with their friends.
Fasching is a party time and lots of fun. I went along to one of the local village’s parade in Rieden am Forggensee, near Fussen. To be successful at Fasching, you need a crazy costume, lots of beer and good friends!
Here are some photos from the day. All taken with the 85L. It’s slow focus was an issue at times, but I did manage to get a few keepers.


Great Ocean Road
Posted on March 8, 2017
Hello guys! Finally got a chance to process a few images from the Great Ocean Road in Australia. This famous coast road takes you through incredible beaches, sleepy villages and wild headlands. Well worth a trip, but be prepared for a long drive. There are a few cool light houses along the way, we stopped at one and saw the perfectly preserved light keepers cottage. Hope you enjoy!
Some 240km of nice roads, the Great Ocean Road is a heritage listed stretch in south eastern Victoria. The area is good for swimming, hiking, visiting villages, sight seeing and of course photography. On this occasion, I did not have the opportunity to use landscape filters, to create long exposure images.. The problems of going with family! :P. However, if you are into landscape photography, this is probably one of the best places in Australia in my opinion.


Brighton Beach Australia
Posted on March 5, 2017
Its another cold, sleety Sunday morning in Bavaria. Winter is slowly coming to an end, and its about time, I’ve had enough of 2 degrees and sleet. Starting to look forward to summer, or at least Spring. Actually, I found some un-processed photos from Australia with sun and surf which might have brought about the negativity! So here are a few photos from Brighton Beach in Victoria to help get everyone into the mood for summer!

Brighton Beach VIC, 5D Mark III, 12mm 2.8 Fisheye
Brighton Beach is close to Melbourne, and is famous for its many colourful little beach shacks. There are better beaches in the world, but perhaps none so colourful! I used the Breakthrough X4 polariser, 24mm 1.4 Art and Samyang 12mm 2.8 Fish-eye here. Hope you enjoy!!


New Travel Albums added
Posted on March 5, 2017
Hello everyone! I have been working on my travel albums. I now have ten albums! I of course hope to add many many more. Travel photography is my biggest passion, and there are many places yet to see. I have now added an album from Denmark in my travel photography section. Denmark is actually my country of birth, so I can’t miss it! I hope you enjoy the photos!
Click here to view a gallery

Danish Pastries!
Germany Added!
Posted on January 30, 2017
Hello everyone, I have now added an album from Germany in my travel photography section.
Click here to view a gallery

First photos after 8 months in Bavaria!
A visit to BMW
Posted on January 11, 2017
My wife and I recently visited the Munich BMW Museum for my birthday.. yes, I know, a brave wife but we did go shopping in Munich afterwards! I took the opportunity to take some photos along the way. If you are interested in cars at all, you shouldn’t miss a visit to BMW Welt and the BMW Museum.

BMW 2002, BMW Museum Munich, 5D Mark III with 45mm 2.8 TS-E
It is also possible to take a factory tour, however on this occasion we didn’t have time for that. Photography is allowed in all parts of the museum. In the BMW Museum part, you cannot bring in backpacks, which have to be put in lockers in the dressing room. I decided to go for an abstract style of photos to try and match the modern technological feel that BMW gives. I therefore used my 45mm f2.8 TS-E lens for most of my photos. This tilt shift lens can be a challenge to use when shooting from the hip in a fast paced environment like the BMW Welt, but I like the results. There is good light in most parts of the museum.
Location
BMW WELT
BMW of course make some excellent sports cars today, and all the current models can be seen and touched at the BMW Welt (BMW World). The Welt building is remarkable, modern German design, and is a treat in itself. It was opened in 2007 and apart from showcasing the vehicles on display the building is also used for conferences, meetings and promotional events. In Munich, this is where buyers take delivery of their new BMW. In addition to all the BMW cars on display, they also have BMW bikes, the Mini, Rolls Royce and technological innovation on display. If you are looking for a souvenir, BMW has that covered too with a large gift shop. There are also a couple of very nice Cafes where you can sit sipping good coffee while enjoying the view!

BMW Welt Munich, 5D Mark III with 45mm 2.8 TS-E
The BMW Welt scores 4.7 out of 5 on Google reviews, and is well worth visiting. Parking is provided under the museum for a reasonable fee. The BMW Welt itself is free of charge.
Official information in English can be found here: http://www.bmw-welt.com/en/

Lonely i8 charging near the car pick up area, BMW Welt, Munich, 5D Mark III with 45mm 2.8 TS-E
BMW MUSEUM
Some 200m from the BMW Welt is the Museum. BMW has a long and interesting history in motorcycles, aircraft engines, cars and race cars. I really enjoyed this excellent exhibition. It is well organized, and the classic exhibits contrast well with the fast paced BMW Welt. Again, the building is very impressive, and there are many special treasures in store, such as early motorcycles from the 1920s, their first cars, a very nice selection of famous race cars, an M-Power room, and much else!

BMW Motorcycle from 1925, BMW Museum Munich, 5D Mark III with 45mm 2.8 TS-E

A room full of great cars! BMW Museum Munich, 5D Mark III with 45mm 2.8 TS-E

BMW 003 Jet engine, BMW Museum Munich, 5D Mark III with 45mm 2.8 TS-E
Also interesting is the exhibits from BMW in the 1940s, when they were roped into the war effort. One of the worlds first jet engines can be seen here, originally intended for the worlds first jet fighter, the ME262. Another interesting war time engine produced by BMW is the BMW 801, a powerful 14 cylinder radial aircraft engine built in large numbers for aircraft such as the Focke Wulf FW190 and Junkers Ju88.
One of the things which impressed me the most was BMW’s commitment to racing. Every car nut knows how successful the 1990s BMW M3 was in racing, but that’s not the whole story. The museum shows a long line of famous race cars, right from the early days to the present day. There are many famous engines on display as well, such as the 1980s turbo monsters, a 1.5 liter engine producing some 1200hp.

People admiring an early BMW race car. BMW Museum Munich, 5D Mark III with 45mm 2.8 TS-E

A classic 1970s BMW race car, BMW Museum Munich, 5D Mark III with 45mm 2.8 TS-E

A modern equivalent, the BMW M4 GTR. BMW Welt Munich, 5D Mark III with 45mm 2.8 TS-E

Many famous race engines on display. BMW Museum Munich, 5D Mark III with 45mm 2.8 TS-E
Back to the Future!
Finally, I also really enjoyed the glimpse into the future the museum provides. There are a few prototypes, and current models which lead the way in technical development, such as the impressive i8 and i3.

A 2009 BMW prototype… BMW Museum Munich, 5D Mark III with 45mm 2.8 TS-E

…And the car is spawned, the amazing BMW i8. BMW Welt Munich, 5D Mark III with 16-35mm 2.8L II
Some Quick Tips!
All in all a great experience. Here are a few tips for photographers if you are thinking of visiting;
- The BMW Welt can be very busy. Everyone wants to sit in all the fancy cars. So if you want good photos you should arrive early, on a week day. If this fails, going for detail shots can save a frustrating situation, where you can’t get a clean photo.
- Be prepared to surrender your camera bag at the Museum section. Choose your lens wisely, bring a spare memory card etc etc. I used a 45mm lens (on full-frame) for most of my photos.
- Light is generally very good, especially in the Welt section. I used iso 400 – 1600, but generally 1000 was fine depending on the aperture.
- Photography is allowed in all the exhibits, but don’t forget to take a few shots of the buildings themselves!
- Using a polariser can help reduce reflections in windows etc.
I hope you enjoyed this little write up. If you did, be sure to follow my blog!
Finally, here is a gallery of photos from the day!


Amateur Aerial Photography!
Posted on November 9, 2016

View from above! – California. 5D Mark III & 85mm 1.2L II at f9, ISO 400
Aerial photography is taking photos from an elevated position such as an aircraft or drone. Aerial shots can be very dramatic as the view point is normally unique and unfamiliar to us. I say ‘amateur’ because good aerial photography is quite scientific, and there are photographers who specialise in nothing but aerial photography. Taking photos from the air is certainly new to me, but I wanted to share my findings on a recent experience. A couple of weeks ago I went to the US, and spent some time in California.
I had to make several internal flights, and thought I’d make the most out of it and try my hand at some aerial photographs. Hope you like the results and the post.
Here are some well known tips on aerial photography;
- Most photographers suggest using a very fast shutter speed, faster than you might think. Sort of 1/1000 territory.
- Depending on the scene, many suggest a focal length of around 100mm on fullframe.
- Many also suggest using a polariser on your lens. This is to cut down reflections if photographing through windows. Also, the use of a polariser will increase colour saturation.
- If on a commercial flight get a seat in front of the wings for an unobstructed view.
- Don’t rest the lens on the window or any part of the aircraft as the vibrations can translate into blurry images.
On my flights, I decided to use my 5D with the 85mm 1.2L II lens. I’m a prime guy, and my only zooms are 16-35mm 2.8L II and 100-400mm 4.5-5.6L IS II and I didn’t think they would be suitable. I started off using a polariser but that didnt work too well with the perspex windows. So I had to take it off. I used shutter speeds around 1/1250 and an aperture of about f9 – f11. For me on that day this required a sensitivity of iso 400 which isn’t a big deal.
I then concentrated on finding some good subjects, which as we were flying over the Rocky mountains wasn’t a problem. After looking at the images on the computer, initially I was quite disappointed with them. The images had a lot of haze in them, which was over-powering. In Photoshop I tried the “dehaze” function in combination with other processing and it worked very well. Refer to below example.

Arizona USA, 5D Mark III & 85mm 1.2L II at f8, ISO 400
My experiences;
- Commercial aircraft windows such for photography…
- Don’t use a poloriser as you will get some weird colours happening through the perspex windows.
- The 85mm focal length was good for me, but 50mm would also have been good (didn’t bring it..).
- The raw files needed a lot of work to get them looking good. Although the detail was there.
- The ‘dehaze’ function in Photoshop is very useful to get the most out of hazy images as can be seen below.
- Contrast and saturation tweaks are also important to get the most out of the images.
- Ensure you use a low ISO and a small aperture to get the best image quality, and as always, shoot RAW!

Before and After processing showing how effectively the haze can be removed. Arizona, USA.
Some Results!


